| CORAL Name: | MA-4 |
| Model Number: | MA-4 |
| Location: | EML |
| What it does: | mask alignment, UV exposure of photo resist |
| Introduction: | The Karl Suss aligner is a precision mask alignment and UV exposure system, with a split field revolving microscope with 3.5x, 10x, and 25x objectives, and 10x binocular eyepieces. Three viewing modes (split field, full left-hand image, and full right-hand image) are possible. There are four directional buttons for movement of the microscope, and a FAST button for rapid movement. The exposure system uses a 350 W high pressure mercury lamp and has an exposure controller set at CI-1, for 9.5 – 10.5mW of output power of 365 & 405nm wavelength. Wafer stage movement is controlled by x, y and theta aligning verniers. A variety of chucks and mask holders are available to accommodate various wafer and mask sizes. There are four wafer to mask contact modes of std. soft, std. hard, soft vac. and full vacuum, essentially going sequentially from lower to higher contact force and therefore resolution, at the tradeoff of more compression damage or potential alignment shift in the case of non ideal resist conditions. Vacuum Mode only works with standard 5” Cr on glass mask with 4” wafers. There are two cntrol panels. The "Front Panel Control" houses: The "Operational Control" Panel has soft-touch buttons, and houses:
|
| Safety: | A mercury bulb generates the UV light, which has shielding to prevent erythema of the skin (similar to sunburn), or possible retinal burns. Don’t look at the stage during exposure, especially when exposing without a mask holder, as with flood exposures. Remember, even indirect UV light can damage retinas. |
| Procedure: | Processing ConsiderationsResist Types:
Mask Making Tips are at the END OF THIS SOP:
Exposure Tips:
Recipes:
ProcedureMake appropriate machine reservations in CORAL, and be kind by only reserving the time needed, and remembering to cancel the reservation if not needed. You will need to "Engage" in CORAL to enable the machine’s operation. Guess the quantity of wafers that you expect to process, and when you disengage, update this value. Always remove your glass mask BEFORE disengaging, or the mask will drop and break, as several functions such as vacuum don’t work with the machine disengaged.
Choose your contact mode: soft or hard for less or more contact pressure, or press vacuum if the better resolution provided by this mode is required. Remove mask-holder from stage by loosening the knurled knobs. Slowly remove mask-holder to allow the microscope time to move up, being careful not to crash the microscope optics with the mask holder.
Either a pieces to 2” maximum wafer, or a standard 4” substrate chuck may be selected, and either a small, or standard 5” mask holder may be selected.
Place mask on the mask holder - shiny glass side down, so the brown CrOx is up. Then turn on the vacuum toggle (test it!) and return mask-holder assembly to the shuttle, which inverts the mask to CrOx down, contacting the resist on the substrate after loading, and clamp the mask holder into place. If Using a transparency, use a “clean” clear mask, making sure it is clean beforehand.
Set exposure time, with the labeled button. Select the time by up/down arrows on the membrane pad, and choose interval and wait states by Using the right arrow. Close “Set Exposure Time” button, and if needed, select “Multiple Exposures” button.
Loading substrate onto wafer chuck
Align the microscope to the mask Using split-field microscope and 3.5X optics initially. Note: One Level or First level exposures do not require aligning microscope to the mask other than chuck centering, and the following paragraph can be skipped.
Press EXPOSE. If necessary, lift the u-scope slightly. Warning: Do not look at UV light while wafer is being exposed. Check the EXPOSURE CONTROLLER to make sure 9-10mW/cm2 is displayed during exposure. After exposure wafer/chuck will drop and the WAFER SHUTTLE should come out. Do not rush to remove wafer from TRANSPORT SLIDE as lock pin remains on for 10 seconds after exposure. Carefully pull TRANSPORT SLIDE out and remove wafer. Repeat above operations to expose other wafers. Always develop/inspect the first exposed wafer to make sure exposure and pattern are correct BEFORE exposing other wafers
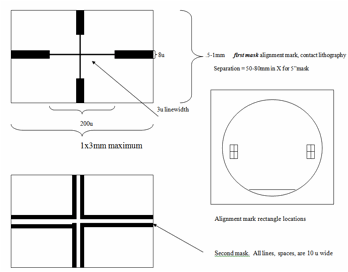
"Disengage" in CORAL. Mask Making Tips:a. Contact Cr Glass and Emulsion Mask Tips: Alignment Marks: Here is a typical Alignment Mark setup for multiple level alignments on 4” wafers. Always choose 5” masks for 4” substrates. Use standard thickness Cr on soda lime glass for contact masks. Notes: Y should be centered, +/- 5mm. Second Mask Alignment window MUST BE Clearfield.
Fine Resolution Contact Masks: Fine features success, below 3um, for use with thin, 1-2um photo resist, requires understanding of, and compensation for, proximity effects. Proximity effects result from light scattering in a somewhat Gaussian distribution after transmission through the mask, so clear areas near other clear areas are over exposed from shared light. Design receded clear areas in these cases. Conversely, clear lines which terminate abruptly have less light at the ends than the line middle, so increase the clear dimensions slightly, perhaps by 1 um in length. For example, a 2 x 10um CLEAR line, could be designed at 12 um long, as the line ends will be underexposed, with no shared light. Or it could be designed at 1.5 x 11um, and deliberately overexposed, widening the activated region. If instead, it is a DARK 2x10um line, consider making the width 2.5 um wide, and maybe 11um long, as the ends will receive extra proximity light effects. Parallel lines of 2um width, 4um period, should be 1.5um clear, 2.5um dark.
Pieces Mask - 4 Masks in 1: If doing pieces, one mask can be used to expose up to 4 patterns or layers. Choose a 4” Cr on glass mask, and have 4 discrete patterns, of up to one inch, tightly packed in the center of the mask. During exposure, we use the 2” mask holder and rotate the mask accordingly. Because of the frame dimensions, a 5” glass mask can’t be offset far enough for this application. Do note that the piece being exposed must always sit on the center of the aligner chuck, or it will not be in contact with the mask during exposure due to the likely failure of the planarization step prior to exposure.
Transparencies Masks: Transparencies of the Emulsion, not ink jet, laser, or electrostatic copier type which aren’t dark enough for patterning, are commonly used when multi layer alignment and fine resolution below 20um aren’t needed, frequently associated with~100 um SU8 resist thickness. You will benefit from consideration of the proximity effects, from slightly different causes, but with similar results, just one order of magnitude larger. First, consider the defects inherent in the clear, not emulsion side of the film will always have air bubbles about 3um distributed throughout. Second, the edges of the line will be rough on the order of 3+ um. Third, scattering besides being a function of the .4um light wavelength, is also proportionate to resist thickness. To compensate for the first two defects, we will always add ~200mJ additional exposure to wash out these imperfections. Consider a 25 x 100um CLEAR line should be made 20 x 95um, with knowledge that deliberate overexposure, including proximity effects, caUsing the width to grow to 20um, and some non- proximity effect lengthening of the line, as well. A similar DARK line could be designed at 25 x 105um. It is critical to have the emulsion “down” contacting the resist, and as it is impossible to clean these films, so consider designing duplicate patterns. |
| Author: | Kurt Broderick; 6/13 |